Monday, December 31, 2012

Wednesday, December 26, 2012

"Read" Book Bag

Merry Christmas!!  I sure had fun with gifts this Christmas.  Not all handmade, but there were a few - the doll quilt for Abigail, and this:

For my in-laws' gift exchange, I pulled my SILs name. She is working her first year as a teacher. I found this pattern and thought it was perfect!


This was so much fun! I added selvedges to the book spines as titles. Some of them are the fabrics they were cut from, even (I'm such a nerd!).  Suzanne had the idea for the selvedges - most of them are from her stash!


The other side of the bag, and my first time trying English paper piecing:


Inside pocket: apples for a teacher!

Wednesday, December 19, 2012

Teacher Zip Pouch

Ian wanted to give his teacher something for Christmas, so i made a little "ruled paper" pouch. (idea for the "paper" from here)  I interfaced a piece of white fabric and then sewed lines at 1/2" intervals in light blue thread across, and another line in pink at 1 1/4" from the side. Then I used a washable marker to write the teacher's name and then embroidered in a backstitch.    (Ian made the card - it's his own spelling! lol)


The back is apples - for a teacher! :D   It makes me happy. I used FlossieTeaCakes tutorial for a zipper pouch - good tutorial. The one thing I'd change if I did it again would be the zipper end covers. They turned out a touch bulky.  Ian bought a little notebook and pen to go with the pouch and is very excited to give it to her tomorrow.

Friday, December 7, 2012

Doll Whirlygig

First finished quilt!! Ok, so it's a doll quilt. But still, I sure learned a lot doing this. Such as to count. I made twice as many whirlygig blocks as I needed, somehow...


I used more of the (never-ending) Genenvieve line by Amy Hamberlin. It's for Abigail for Christmas! I am so excited to give her the beautiful doll cradle my dad made for me when I was 3. I also made a little mattress, pillow and sheet for it.


The whirlygig block is from the tutorial here, which was great - no template and no trimming! I also tried out my first free-motion quilting. My machine wasn't too happy about that - it kept having tension difficulties and nesting on the back.


I tried something I've seen my friend Suzanne do and made the back interesting:


Tuesday, November 13, 2012

Ducky Hoodie


Abigail is BIG into ducks lately!! (Mainly because it's a new word for her, I think.) So of course, I had to embellish this hoodie with a baby ducky.


Details

Pattern: Heidi & Finn Urban Unisex Hoodie
Fabric: 3 Superstore teeshirts, polyresin snaps
Size: 18 months
Mods: I skipped the cuffs, hood and sleeve linings, and bottom band. I cut the bodice pieces on the existing teeshirt hems, with a couple inches extra length. Didn't have any large enough pieces for two whole sleeves, so I cut the short sleeve from the sleeves of the yellow teeshirt, and the cut the undersleeve from the orange teeshirt for a faux-layered look (also existing hems!). For the hood, I covered the centre seam with a strip from the yellow teeshirt, and used the neck ribbing from that one for the front edge of the hood. I rolled the yellow lining out a bit to the front when I topstitched the edges. The applique is an image I found online. I used some Heat-n-Bond to apply it, then used a reinforced stitch to outline. 
 
Thrifty Moments: All three teeshirts were on sale for $2 each at Superstore this summer. Also, when I reused the neck binding of the yellow tee, I was able to get the serging out easily, and I reused the yellow thread! (didn't have the right shade yellow in my thread drawer)


And look who's walking! With the help of an old cardboard box. She has been trying out the little walker toy we have too, and even letting go occasionally.


Thursday, November 1, 2012

Sophia Holiday Party Dress

I made the Sophia Holiday Party Dress for Abigail for Christmas/winter. It went together very quickly again (made it last year for Christmas too!).

Pattern: Sophia Holiday Party Dress
Size: 12 months
Fabric: remnants of burgundy velvet, black crushed velour, and thin pink jersey
Mods: Added 2" wide sash.

I love that this cost probably all of $4 to make - gives my thrifty heart thrills. Here's my ticked off little girlie modeling:


I understitched the neckline, instead of pressing or topstitching. Still hoping I can get the creases out of the velvet by steaming.


How I did the sash: I cut two rectangles, 2.5" by the width of each bodice piece. I cut the lining pieces each 2 1/4" longer (ended up trimming 1/4" off later). The sash pieces I cut 4 1/2" wide by about 20" long each. I sewed the sashes lengthwise, right sides facing, tapering to a curve at the ends. I sewed the other two sash pieces to each bodice (used 1/4" s.a. for all) and then when I did the side seams, I inserted each long sash in the side seams, putting a small pleat in the centre of each to fit. Then I assembled the rest of the dress as per the pattern.

Sash detail:


Great pattern, fabulous outcome!  Berritt is great with pattern support and her patterns have lots of photos and detailed instructions. I love how fancy the bubble skirt makes it. The only thing I might change next time would be the neckline. Tends to gape a touch. Either make it less scooped (but then it might not slip over her head?), or maybe just a little lastin in the s.a. would help stabilize/pull in the neckline.

Oh, and one thing I totally didn't think of with adding the sash - I should have just cut the back bodice longer in the burgundy, instead of doing a separate black sash piece at the back. I realized when it was all together that the ends of the sashes are supposed to just extend from the front... Oh well, live 'n learn.

Saturday, October 27, 2012

Star Wars Costumes

On Monday we are going to Star Wars Identities at Telus World of Science! It's been booked for like a year.     Figure we'll use the costumes for Halloween too.  We had this plan we could all go in epic costumes... Well, epic turned into scurry -  here's the handmade/upcycled part.

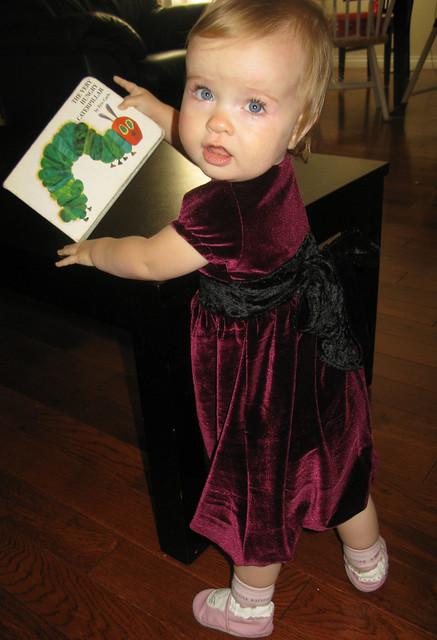
Abigail as Princess Leia:


Dress
Pattern: L&B's Sweet Little Dress pattern. I just extended the sleeves straight down, then when the dress was assembled I cut the sleeves on an angle down.
Size: 12 months
Fabric: Cotton velour
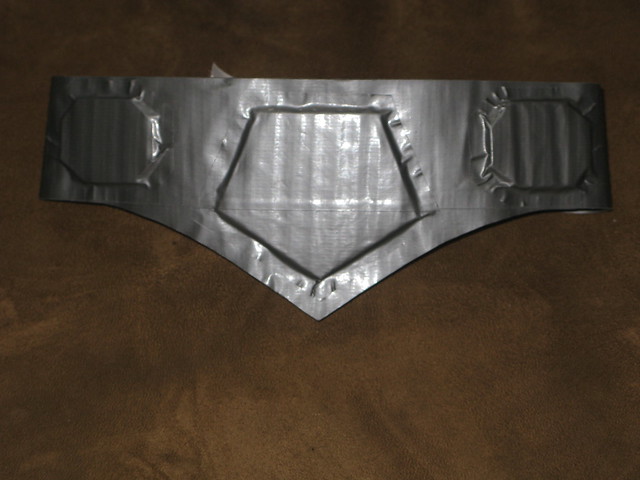
Belt
I just used two rows of duct tape backed with another two rows, cut the shape out, and added cardboard cutouts with more duct tape. Then I took a piece of 1/2" elastic and "cased" it on each end inside two more layers of duct tape, and attached velcro. Should fit a nice long time (if it lasts!).


"Wig"

Made a headband out of brown FOE. Braided some dark brown yarn and coiled and sewed it onto felt circles, then attached to either side of the headband.


Benjamin is going as Yoda. He was set on this ever since we watched Star Wars.
Crappy photo (before I adjusted the clothes)

[photo not avail]


Costume
A friend lent us a Judo robe and an old women's robe, which she dyed brown. They were huge on Benny, so I hemmed the sleeves and length of the brown robe, and brought the shoulders up a bit (makes a pleat from the top) and hemmed the sleeves of the white robe.

Yoda Hat
I knitted this hat a week or so ago, and have since then been working on felting it to the right size. It was too huge to start, I think... I ended up sewing some FOE inside the brim to pull it in. I also handstitched wire around the ears and through the top of the hat - it looked more puppy than Yoda. The handstitching took forever!! I should really own a thimble.


The rest of us have store bought costumes. Crappy quality, I might add. And $$$    Oh well - I'll post a photo of all of us together on Monday!

Friday, October 26, 2012

Feliz Sew-along - Assembling! (part 3)

(Part 1 here and Part 2 here)

Now we have an overdress and an underdress and two straps. Here's how to put it all together:

1. Assembling the dress

  • Step 1 Pin the straps in place with raw edges aligned (baste, if preferred). Then turn the underdress inside out and place the overdress around the underdress, right side of overdress facing wrong side of underdress. Match the back corners of the overdress side piece with the back corner of the underdress that we left extended. Sew.

  • Step 2 Trim the back corner and clip the curves, then turn.


2. Press and topstitch all around the top of the dress, being sure seam allowances are tucked in at the back corners.


3. Sash Casing

  • Step 1 Pin the sash casing with the sash sandwiched between the overdress and the underdress. It just turned out that the back elastic casing exactly matched up with the stitching lines for the casing (no, actually I planned that... lol)

  • Step 2 Sew the sash casing, making sure not to sew through the sash.


Your Feliz Party Dress is finished!!


It's quite long on her still, but I just had to try it on her! She's wearing 12-18 months clothes now, so hopefully this will fit in summer.

Thursday, October 25, 2012

Feliz Sew-along - Underdress (Part 2)

(Part 1 here.)

OK! Now for the underdress. LOTS of photos ahead. :)

1. Straps (I combined the front and back strap pattern pieces and cut them as one. If you are doing both pieces, the first step is to sew that shoulder seam on each strap.)

  • Step 1 Fuse interfacing to two of the shoulder straps

  • Step 2 Sew the straps and clip the inner curves

  • STep 3 Turn, press and topstitch straps.


2. Back panel and elastic casings

  • Step 1 Finish the bottom edge of the back facing and attach any size tags.

  • Step 2 Sew back facing to back underdress, right sides together, along top only.

  • Step 3 Turn, press and topstitch top seam. Mark and sew elastic casings along back. (I marked mine 3/4" wide)

  • Step 4 Insert elastic and securely sew on one end (I used 1/2" wide elastic).

  • Step 5 Cinch elastic to about 2/3 width, then sew ends securely and trim.


3. Back ruffles

  • Step 1 Hem the back ruffles. I did a rolled hem with my serger.

  • (Step 1b - if you are not using ribbon, fold over the top edge of the ruffle to finish, or make sure to sew it on upside down and flip & topstitch)

  • Step 2 Sew seams in bottom ruffle and hem.

  • Step 3 Measure and pin ruffles on back. I sewed the bottom ruffle first, so the hem of the bottom ruffle was at 1/4", the seam allowance for the long ruffle all the way around the bottom edge. Then I placed the other two ruffles from that first one.

  • Step 4 Baste the ruffle edges in the seam allowance.

  • Step 5 Sew ribbon over top edges of all ruffles.


4. Underdress assembly

  • Step 1 Sew front underdress to sides, finish seams, press toward front, and topstitch.

  • Step 2 Sew back underdress to sides, making sure that the side pieces extend above the edge of the underdress back by the width of the seam allowance.

  • Step 3 Finish the seams, press toward the sides and topstitch.


5. Bottom ruffle

  • Step 1 Serge bottom edge of underdress all the way around, then gather and pin the hem ruffle in place evenly. I sewed mine on just overlapping the 1/4 seam allowances, not right sides together, so that there'd be less bulk. (If not using ribbon, sew right sides together, flip down and topstitch.)

  • Step 2 Apply ribbon to top of hem ruffle.


Your underdress is done! Whew. Tomorrow I'll post the last part, assembling all the dress parts!

(Part 3 here)

Sunday, October 21, 2012

Feliz Sew-along - Overdress (Part 1)

I'm doing a sew-along for the Feliz Party Dress from the book Sewing Clothes Kids Love with a group of friends from a forum I'm on. I figured while I was at it, I'd document it in photos. The instructions in the book leave a bit to be desired details-wise. For my first Feliz, I found the Trillium photo sew-along helpful, but there were a few points that were hazy even there that I'm hoping I can make clearer.  SO here goes!

Yesterday I tackled the overdress. The book starts with the sash and button loops, then moves on to the overdress, so I will too. (I'm making the smallest size, 86/92 (18mo-2T))


Cutting.  Here are all the pieces cut out. Notes:

  • Pattern does NOT include seam allowances! (not used to that...)  I cut mine at 1/4" because I can do a pretty precise 1/4" seam allowance, and then I serge to finish.

  • For the ruffles on the back of the dress (never mentioned in the book, but everywhere online!), I decided to do three tiers, and then the bottom ruffle around the whole underdress hem. I cut my ruffles at 2.5" width. The length of each I determined by measuring across the overdress back piece at the levels I will sew the ruffles. I did not include hem allowances for ruffles because I will be doing a serged finish on the bottoms of each, and covering the top of each ruffle with ribbon.

  • The first Feliz I made, the back panel of the underdress was pretty heavy, so it hung lower than the front. This one, I shortened the back panel about 1" at the centre, tapering to the edges, so it hangs more evenly with the weight at the back.

  • I cut the front and back shoulder strap pieces together, so there's no seam at the top of the shoulder strap.

  • As per note in book about dressing ease, you can cut the sash pieces 3-4" shorter, then insert elastic in the ends.


1. Piping (optional). I chose to add piping to the front seams of the overdress. I'm using vintage piping that's a really odd size, so I basted it on before sewing those seams.


2. Sash (repeat for second sash piece)

  • Step 1. Fold the sash lengthwise, right sides together, and sew down the long side and one short end. You can either sew the angle as marked on the pattern piece, or just sew it straight (as I did)

  • Step 2. Clip the corners.

  • Step 3. Turn the sash right side out and tuck in the point if you sewed it straight across. Press.

  • Step 4. Turn in raw edges of sash, insert 2-3" of 1" wide elastic into the opening and secure. Topstitch sash.

  • Step 5. Sew the ends of the sash elastic in the seam allowance of the overdress, wrong side. The sashes should be stitched into the seam facing toward the centre of the overdress. (see right)

  • Step 6. Topstitch dress on outside, catching the elastic back on itself in the seam allowance.


3. Ok - I got ahead of myself there. Sew the overdress.

  • Sew overdress side pieces to overdress front piece, right sides together. (I found with getting the piping in straight it was easier to sew these seams, then put the sashes in.)

  • Finish seams.

  • Press seams away from the overdress front toward the sides, then topstitch on the outside.


4. Interfacing for sash casing.

  • I don't have very good photos of this - the interfacing for the casing should actually be applied before sewing the overdress seams. (oops!)

  • Step 1. Cut fusible interfacing using markings on pattern. I cut with 1/4" extra on each edge.

  • Step 2. Apply fusible interfacing to the wrong side of each overdress side piece, where marked on pattern. (Continue to assembling overdress.)


5. Hem and Back Edges

  • Step 1. I'm not using the back facings for this one, but if you are, apply them now. I just serged the edge, pressed it over, and topstitched it down.

  • Step 2. Serge hem of overdress. I used a needle to draw the serger tails back under the stitching.

  • Step 3. Apply hem binding or rickrack (optional). I used a large rickrack. Fold the end under and sew the rickrack onto the right side of the hem so that the serging is just not visible above the dips in the rickrack. I sewed a straight line from one dip to the next, curving the rickrack to follow the hem. At the end of the hem, trim and tuck the end under.

  • Step 4. Finish hem. For rickrack, fold the rickrack to the back of the dress, pressing so the points of the rickrack show evenly. Topstitch.


8. Finished Overdress!


(Part 2 here)

Friday, October 19, 2012

Well... so much for KCWC...

Day 3 I did some knitting, and then Thursday I had some dental work, and somewhere in there picked up a bug of some kind. I was in bed for several days and then several more low-energy days followed. So I didn't get any more sewing done till Wednesday. One of the things I'd cut out for KCWC was this Comfy Sleep Set:


Details:
 - Pattern: Fishsticks Designs Comfy Sleep Set
- Size: 12 months with 18 months length (slim 18M)
- Fabric: pajama fleece with cotton velour for trim
 
Now - would you put this on a boy? I made it thinking it could be either boy or girl pjs, but my husband thinks it's definitely girly.


Next up:  Another Feliz Party Dress!  I'm hoping to post more progress photos as I go this time.

Tuesday, October 9, 2012

KCWC Day 1 and 2

I didn't get as much cut out as I'd hoped last week, so not going to get as many things done this time around. I only got about 1/2hr sewing time in yesterday, but I'm calling this first one Day 1:


Details:

- Pattern: free Simply Sweet Frock by Valorie of Simply Together
- Fabric: cotton velour
- Size: about 2T
- Mods/comments: I did not add seam allowances, as I’m using a stretch fabric. I also bound the neck edge and cuffs with fold over elastic. I’m thinking this needs something – a sash? appliqué? The instructions were very vague, as she says, but ok if you understand garment construction. If I make it again, I would cut the sleeve separate from the body, so there are raglan seams on both front and back. I found the back hung a little lower than the front. Also would pull in the FOE a little more on the neck edge.
 
 And Day 2:


Details:

- Pattern: the bodice is the top part of the knitting pattern Milo. I just winged the skirt.
- Fabric: the bodice is knitted from Lionbrand Cotton-Ease. The skirt is quilter’s cotton.
- Size: 9 months
- Mods/comments: I love the Milo pattern! I've knitted the full vest several times, but wanted to see how it would work out as a dress top. I just did a couple rows of garter stitch about an inch past the armholes, then cast off. The skirt was two rectangles, each 20" x 11", sewn together on the short sides, and then gathered to the bodice. I sewed between rows of garter stitch, and the stitching is pretty much invisible. I used Wooly Nylon in the bobbin to allow for some ease. I used a "hemless" finish with a contrasting print.

Thursday, October 4, 2012

KCWC Fall 2012!

I'm excited for another Kids Clothes Week Challenge! It starts Monday, October 8 and runs the whole week. I'm hoping I'll get some things cut out this week (what's left of it!) so I can buzz through a whole pile of things next week.

Here's some of my hope-to-sew list:

-tunic or dress for baby gift
-Feliz in blue butterflies/flowers
-Ooga Booga Heidi & Finn hoodie for Abigail
-Heidi & Finn hoodie for Benjamin
-Heidi & Finn hoodie for Ian
-Sophia Holiday dress for Abigail
-matching leggings
-Halloween/Star Wars exhibit costumes
-Leila & Ben Sweet Little Dress x2

Sunday, September 23, 2012

Emmy for Abigail

So... after the preemie Jamie Jumper I made turned out so well, I had the guts to cut into my other hoarded knits: Two Emmy's for Abigail!

Pattern: Fishsticks Designs "Emmy" Dress or Top (I think the pattern is retired)

Size 12-18 months

Fabric: Joann's cotton interlock

Details/Mods: Hems with twin needle and regular thread on top, Wooly Nylon in bobbin. Sewed all seams with WN in bobbin, and serged. I found the cuff band for the long sleeve was about 2" too long, so I trimmed that. I also tapered the sleeve a good bit, to about 1.5" less wide at the cuff, as it was quite baggy on Abigail.


AND look who's standing on her own!!


Have to stamp the size in the label at the back of the neck yet!

Friday, September 21, 2012

Dino Dudes Jamie Jumper

My friend Stephanie had her baby boy on Tuesday, at 34 weeks. Her little guy is 4lbs 7oz, teeny! Exactly the size Abigail was. But doing very well. I get to visit them tonight with my friend Suzanne!

I've been hoarding this Dino Dudes fabric and trim I won from Bonnie (a few years ago? 
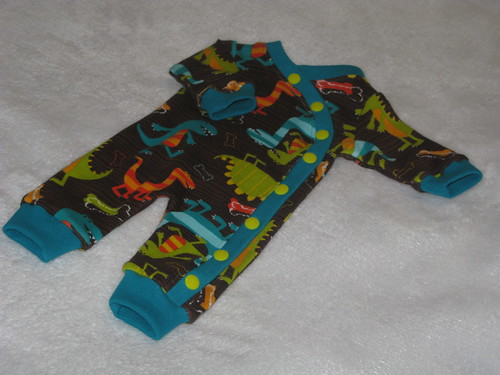
) in her Comfy Sleep Set giveaway. To make the preemie sized Jamie Jumper I printed the 0-3mo size at 80% and scaled the trim pieces also to about 80%, but kept the widths. It looks very similar to the 3-5lb sleepers we had for Abigail! Debating trying to figure out a matching hat.


First time I've ever made the JJ. The top snap was a little squirrely to get in. I think I probably needed a long-prong there.

Monday, September 17, 2012

Feliz Finished!

This morning I finished the Feliz Party Dress!!  I love the finished item, but I'm really glad others sewed it before me and made detailed photos/comments on construction, because boy, is the book sparse on directions!

Details:

  • Fabric - "Genevieve" by Amy Hamberlin for Henry Glass Fabrics

  • Trim - grosgrain ribbons

  • Size - 98/104 (3T-4T) size, without seam allowances

  • Modifications/more info - No seam allowances (by mistake, as the patterns aren't marked as needing them - you have to find that detail in the introduction); added 3" of elastic to the inside ends of the sashes, as per the tip in the book; cinched in the back elastic quite a lot; added faux piping (3/4" strip of fabric, pressed in half and inserted in seam) along front panel edges; finished back ends of shoulder straps and topstitched them inside the back of the dress, instead of sewing them into the seam, for adjustability; bias tape trim for overdress.


Front:


Back:


I will try add modeling photos later, if I can find this size model! :)