Wednesday, December 4, 2013

Advent Calendar in use

Just wanted to update with what we are doing with our Advent calendar. I found a list of Bible verses for each day of December until Christmas (just from this pin, which has nothing else linked), and I also found a printable Advent chain with the names of Jesus. The kids are especially loving the chain! We are doing it reverse of what they suggest - we are adding one link each day and hanging the partial chain on our tree. Each morning so far they run to see what the next name is in the day's pocket and we read the corresponding verse and talk about it. (also we printed it on white paper and they coloured and decorated the strips!)


In the evenings at our family devotions we read the text from the Advent calendar and discuss it, and then we pick a Christmas hymn. So far we are singing hymns such as Comfort, comfort ye my people, O come, O come, Emmanuel, and The people who in darkness walked, which all have a strong feeling on longing and waiting. Closer to Christmas we'll sing more of the Jesus is born songs.


This morning I asked the boys if they knew what Advent means and Ian (6) was excited to share: "It means 'coming'!" I don't know where he learned that, but it's sure a lot simpler of a definition than what I was prepared to tell them! Out of the mouths of infants, indeed. <3

Tuesday, December 3, 2013

The Places You'll Go!

Finished another quilt to donate to the Pregnancy Care Centre! This makes the fifth, three of which were made mostly from fabrics generously donated by Fat Quarter Shop. The others were an I-Spy Quilt, Flannel Rail FenceDisappearing 9-patch, and Green Eggs & Ham. Some babies and their mamas are going to be cheered up, I hope!


The fabric is some random Dr. Seuss fabrics by Robert Kaufman, plus some coordinating semi-solids. Suzanne very kindly quilted it with an all-over free motion loop pattern. Dimensions: 33" x 48.5".


The backing is pieced together of all the leftover pieces of Dr. Seuss fabrics. Nicely quilted, isn't it? Thanks, Suzanne! :)


Friday, November 15, 2013

It's Snowing! Advent Calendar & Bonus Table Topper + tutorial

I won a charm pack of Moda's It's Snowing quite a while back and I finally found the perfect project for it!

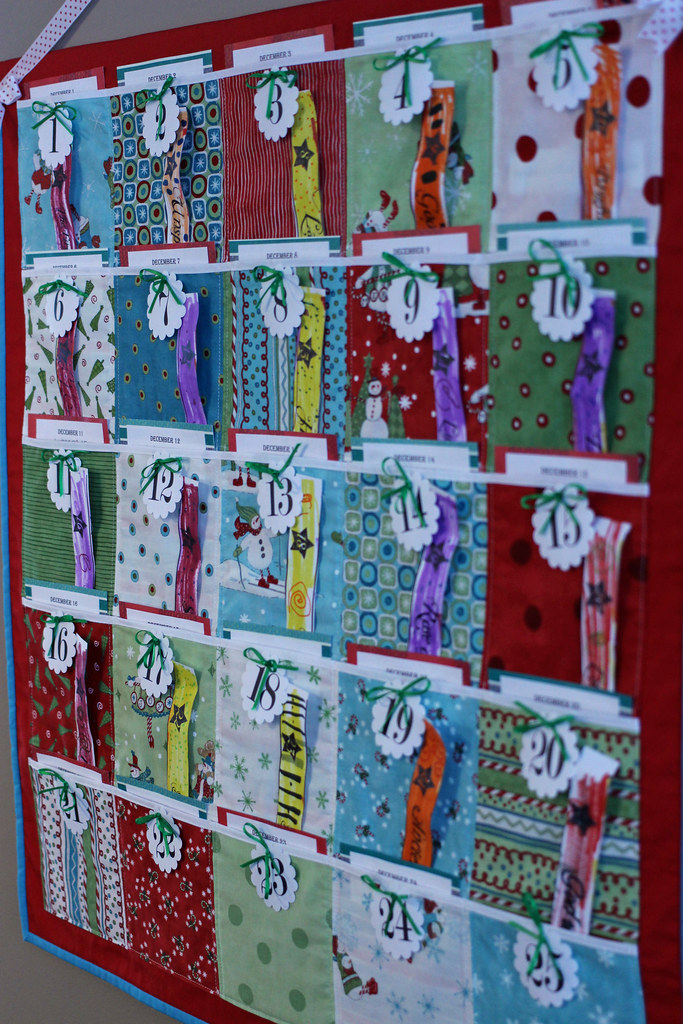
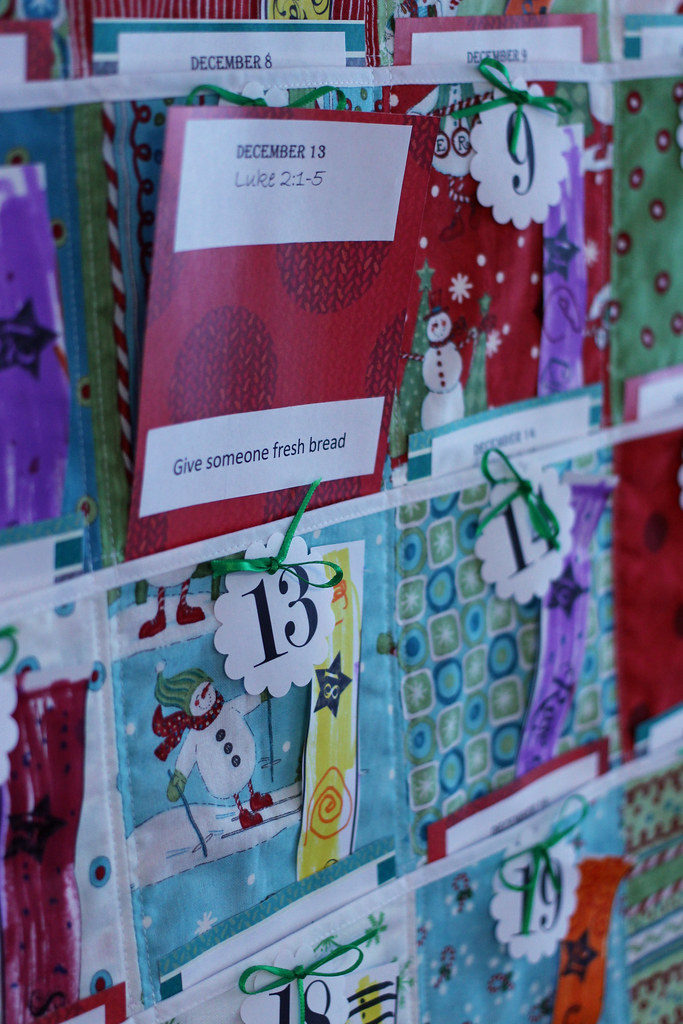
This year I'm hoping we can be more intentional in our anticipation of Christmas Day and what it means that Jesus came to earth that night. As part of that, I designed this Advent calendar, with the intention to put a card in each pocket with some scripture and an activity.


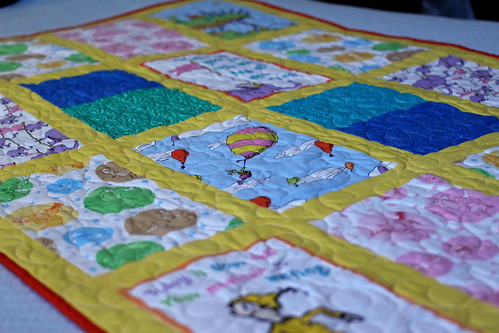
The charm pack had 37 squares, so after I was finished I had 12 left - paired with the same aqua and red that I used for the calendar I came up with this table topper as a happy bonus!


So here is a little tutorial in case you want to make your own Advent calendar this year!


Materials for Advent Calendar
1 charm pack (It's Snowing! by Deb Strain)
1 1/2 yard fabric for base/backing (53"x25")
26" long wooden dowel or narrow flat strip of wood
coordinating grosgrain ribbon
batting or interfacing
coordinating 1/2" single-fold bias tape
coordinating fabric for binding
Additional materials for table topper
18"x25" fabric for backing (will fit from the base fabric leftover from the calendar)
batting
12 coordinating solid 5" squares
coordinating fabric for binding

First decide on 25 squares of the charm pack to use for the calendar (the leftovers, 12 if you have a pack of 37, can be used for the table topper). Arrange them in 5 rows of 5 and then sew each row together using 1/4" seam allowance. Then bind the top edge of each row with the 1/2" single-fold bias tape.


All the pocket rows pieced together with bound top edges.


Turn under the sides and bottoms of each row 1/4" and press. I first basted 1/4" all around the edges to make it easier to press.


From the base/backing fabric, cut a piece that measures 53"x25". Fold it in half (hamburger-style) wrong sides together, and sandwich either a piece of batting or interfacing between the two layers. The fold will be the top of the calendar and a casing for the dowel. (Alternatively you could use two different fabrics for the base and the backing and seam them at the top.)


Arrange the pocket rows on the base and pin. There should be at least 1" of the base fabric on all sides of the pockets, excess can be trimmed later. Topstitch the sides and bottoms of each row about 1/8", securing at each end with a backstitch. (see white stitching lines)


Then topstitch down the full length of the calendar, through all 5 rows of pockets from top to bottom and then back up again, 1/8" on each sides of the seam lines, securing at the beginning and end.


Now you should have 5 rows of 5 pockets each, with the bound edge of each pocket open.


You can use applique, embroidery, fabric paint/etc if you want to put on the numbers 1-25 on each pocket. I still want to find some small chipboard numbers I can hang from each pocket with ribbon...

Trim the sides of the calendar base to 1 1/4" around the pockets and the bottom to 1". Then fold under 1/4" and press the edges at the fold where the dowel will be going through; stitch. (pic1) Trim 1/4" from the sides to meet up with the casing edges. (pic2)


Bind all around the sides and bottom of the calendar, folding under the binding at the beginning and end for a neat finish. Then push the dowel through the casing. Determine the length of ribbon needed to hang the calendar and cut. Tie a bow at the centre of the ribbon and hot glue or handstitch the ends at the back of the calendar. Hot glue or handstitch a bow at each side over the ribbon.


Your Advent calendar is now ready for the pockets to be filled and hung!


Table Topper
The table topper is pretty simple - just half-square triangles (I used method #2 here) pieced from the remaining 12 charm squares and 12 solid squares.

Cut 12 5"x5" squares from the coordinating solid. With fabric pen and ruler, mark a diagonal line across each solid. Pair each solid with one charm square.


Right sides together, stitch across each pair of squares, 1/4" on each side of the marked line. I chained stitched all of them one way, turned the whole line around and back up.


With rotary cutter and ruler, cut each stitched pair in half along the marked diagonal line.


Once they were all cut, pressed, and trimmed, I was able to play around with arranging them - I chose a chevron pattern, but you could also do pinwheels or diamonds or flying geese... Here are some of the chevron layouts I was playing with (excuse camera phone pics):


Sew each row of your chosen layout together, being sure to match points. Layer backing, batting and top and quilt! I did a simple 1/4" echo inside the solid chevron. Then trim and bind and you're done! Bonus Christmas table topper!


Friday, November 1, 2013

Halloween 2013 - Attack of the Gauls!

Asterix, Obelix and Dogmatix came knocking tonight!


Ian chose Asterix when his school had Book Character Dress-up Day this month - Asterix is his favourite comic! Obelix and Dogmatix are obvious choices for the other kids.

Asterix's pants/shirt/belt were from my friend and I was just going to make the hat, mustache and sword and keep it at that - until the night before dress-up day when he was very sad there was no sheath and no magic potion bottle. So I spent a couple of hours sewing up some leather scraps and Asterix was very happy.


A paint stir stick with some carved detail and a bit of paint made a nice sword and I just sewed the leather sheath onto the belt. (ICK! sewing the sheath was a pain. I ended up handstitching the tip because my machine wouldn't make stitches through 4 layers of leather.)


Bottle with magic potion inside (just some scraps of leftover tshirt fabric):


I couldn't figure out why Benjamin was reluctant to be Obelix until he said, "I'm not fat. I don't want anyone to think my tummy is so big!" He changed his mind when I assured him everyone would know there were pillows stuffing his pants... Speaking of which pants, really simply made - I just took a pair of his pants as a pattern, cut the pieces kind of in gores, extended for the torso part, all bargain sweatshirt fleece. Obelix's "chest slipped" (heehee) till I added a pair of straps to hold the pants up. The belt circles are craft foam with fabric glued on, attached to the pants by snaps so if it needs washing they come off.


The helmets: I simply draped an old tshirt over each boy's head and covered it with duct tape. The knobs are balls of tinfoil covered in duct tape, the feathers are layers of white craft foam cut to shape. Both mustaches are yarn tied to clear elastic, looped over the ears. Obelix's braids are also yarn, tied with fleece bows and attached inside his helmet.

Dogmatix: I pieced together the hoodie from largish scraps of white and black fleece on the shelf, added ears with a strip of boning inside each, and pinned a tail onto her (bought) black pants. Abigail's favourite part was the black nose! Here she is, stuffing her puppy face with chocolate and drooling over her spoils of war:


Wednesday, October 16, 2013

Roses & Black Lace Tunic

(before I found a black belt to wear with it)

Finished sewing up this tunic for myself started during Selfish Sewing Week! I'm very pleased with how it turned out, especially as most ready-to-wear tunics end up being less tunic and more shirt with odd waist placement on me... YAY for getting back into sewing for myself!!

Details
Pattern: New Look 6915, view D
Size: 12 (even though I measure their size 16!!)
Fabric: Roses and black lace print


Fairly simple pattern. I think this style only works for me because I'm tall and have a small bust. It could very easily look boxy or shapeless. The front is cut on the bias and has pleats at the shoulders to help with the draping. I adjusted the pattern for length by adding 2" above the marked waistline casing. The only issue I find with this style is that it slips around a lot on the shoulders. Otherwise it's just how I pictured it!

Here is my only pic so far with a belt:


Saturday, September 28, 2013

More Selfish Sewing!


My Uptown Coat is finished!! Been working on it most evenings since Wednesday and finally sewed the last button on just now. Phew.

I love it!


Details
Pattern: Favorite Things Uptown Coat
Fabric: Teal corduroy, gold, olive and teal paisley satin
Size: Medium, with length adjustments
Notes: This was a good first coat try. I first did a quick muslin of some random thin stuff I had, just to see the fit. The only adjustments I made were in length. I know I have to add 2" to any top already, but the muslin showed it would still be short so I added 3" to the bottom of the coat length and sleeves. As it turns out, I could have used another inch at least to do the proper pleat hem, but I made it work. The pattern directions are rather sparse, unfortunately, especially about the hemming.


Tuesday, September 24, 2013

Selfish Sewing Day 1

Joining in on imaginegnats' Selfish Sewing Week! 


Here's my Day 1 (+1/2). (excuse the weird poses - trying out the self-timer!)


Details
Pattern/tutorial: Ariadne Tunic Top by Tanit-Isis
Size: medium (with mods)
Fabric: super soft, drapey blue jersey leftover from this project (third photo)
Mods: Cut the top 1.5" longer because I have a long torso. Reduced the band width several times (maybe 6" total?). Tapered the sides at the hem about 3" on each side as it was just too blousy - looked like a couple of "spare tires" were hanging out. Overlapped the keyhole opening at the top before binding the neck edge.


I love it!! And can I just say: I LOVE my man! My machine sewed this jersey without eating it, stretching out the seams, jamming up into the bobbin - all because my very dear husband brought home the walking foot I have been thinking of for years! I nearly chortled (does anyone even use that wonderful word anymore??) with glee as it zipped smoothly through the seams and stitched on the binding without a problem. Look out, knit stash! Here I come - no more fear!


(also linking up to Go To Sew's iSew link party)

Tuesday, September 3, 2013

First day of Grade 1!

Can't believe my oldest is going to school full time. It was a little hard to be cheerful for Ian this morning. No photo of him ready with his backpack - it was full of his school supplies so when he put it on he nearly fell over backward!


He needed a paint shirt for school this year, so I got oliver + s: little things to sew out of the library and got to work on the Art Smock. (sorry for the crummy photos)


I also made one for Avery, his best buddy (girlfriend?) from kindergarten.


Both smocks are the medium size. The pixelated camo is a light canvas and the butterfly camo is twill, so they should hold up well. They close at the back with snaps.

And I had a little fun with my washi tape collection! Fairly simple way to label a pencil box - I just covered it with striped tape, then used an X-acto knife to cut the strips for letters and scissors for the letter B. Then I covered it with contact paper so it doesn't rub off.


Wednesday, August 28, 2013

(Not so) Skinny Jeans

Laura from Titchy Threads/CraftStorming has a new pattern up - her Small Fry Skinny Jeans in size 2T. I sewed along last week and am finally posting photos (new camera - yay!). (She will release a full pattern with more sizes in future.)


They are large. Not skinny (yet). And too long. But other than that, perfect! :)  Abigail will grow into them. Currently she's wearing 18months and some 24months in ready-to-wear.


I used some bargain bin fabric for $5/m - it's a lightweight stretch denim. The lining of the pockets and the waistband facing are scraps leftover from a home dec project. Plus a button and topstitching thread - total cost was under $7!


I made a template of the back pocket out of paper, drew on the design I wanted, then cut it out and traced onto each back pocket. Love how it turned out!


For the front pockets, I wanted a nice clean edge at the outside curve, so when I pressed the pocket I forced the lining to roll out at the inside curve. This project had several firsts for me - first time doing a half-fly, first time making manual buttonholes (without my magical buttonhole attachment :( ), first adjustable waistband.


This Titchy Threads pattern is well-written and drafted and I was able to follow the directions in reverse for a girl version, as she marked the differences. Definitely planning a second pair! In fact, I've already bought the fabric: kelly green twill with a green and yellow fabric for the linings!

Thursday, August 22, 2013

Jersey Lovin' (and a giveaway!)


Welcome to CraftyHour for my stop on the Jersey Love Tour! I was super excited for a chance to be part of Bonnie's tour and try out one of her great new patterns. AND also try Riley Blake's new line of  Jersey Basics!

I had a hard time choosing which pattern to try. The Runaround Pants looked like they'd be great on one of my boys, but I know just how hard they are on pants. I also loved the Carnival Skort (keep scrolling! ;] ). Finally I chose the Beachcomber Dress - picking out fabrics for it was a treat!


The pattern: As with every one of hers I've used, Bonnie's pattern was perfectly detailed, printed out properly, and was easy to understand. There were a good amount of tips and pointers for working with the fabric that really made it easy. I decided on the size 18 months because Abigail is still wearing mostly that size in ready-to-wear.


The fabric: I have sewn with knits before, with varying degrees of success - interlock, rib knit, jerseys - but never anything like the RB jersey! It's mostly cotton with 5% spandex, giving it a great recovery. When the fabric came I was in awe of the soft and smooth feel, but sewing it was even better. I don't have a walking foot on my machine and sometimes have to rely on spray starch to be able to sew knits. With this, I just lessened the presser foot pressure and it fed through beautifully! The best part was not worrying about finishing anything or hemming!

The BEST part about this wonderful jersey - washability! While I was taking photos in the backyard, little missy snitched a baby tomato from the garden, and right after this next photo, sprayed it all over her front! I was horrified, but with a pre-treatment, it washed right out! Then the next day my husband spilled coffee (don't worry, not hot) down the front, so in the laundry again. The stains came out and it still looks great!


It was a great sewing experience and we now have a gorgeous quality, hand-made garment that gets lots of comments when we're out! She loves her soft and "pitty" dress and I definitely love how easy to clean it is!


The only modification I made from the pattern was to add a back neck reinforcement/size tag. 


.
.
...and then... I had enough left to make a Carnival Skort too!


Again, great detailed instructions with colour photos of each step. The only twitchy bit was getting my head around sewing the shorts, waistband and skirt together. Stretching the waistband to fit while stitching it all flat was a bit tricky, and then when I turned it right side around I realized the shorts were wrong side out! Durrrr... A bit of stitch-picking later, and rereading the directions and then it worked out properly.


The fit is great! I love that the skirt did not need elastic in the waistband, which sits comfortably on her and doesn't sag or droop at all.


The little shorts attached underneath are the best! I may just have to do this for skirts in the future. The diaper/panties are covered at the same time as they keep the skirt from twisting around.


And just because she's so cute smelling "fowers":


Be sure to have a look at all the previous stops on the Jersey Love Blog Tour, as well as the stops for tomorrow - the last day!

Now - how would you like to try one of these patterns? Bonnie is very kindly giving away your choice of either the Beachcomber Dress pattern or the Carnival Skort pattern! Just enter below.
a Rafflecopter giveaway