Wednesday, April 30, 2014

Selfish Sewing Week Cardigan

Something more for me!


Details
Pattern: Scarf Neck Cardigan by Swoon Patterns
Size: Medium with 2" added length
Fabric: Lightweight olive slub-knit poly/cotton jersey
Mods: Added 2" in length to the body pieces and 1.5" length to the sleeves. Cutting was a bear - the fabric I used was off-grain, nearly 45*, so I had to refold and fiddle to get it all to fit.
Fit: The shoulders fit well. The armscye is a little too deep and the sleeves a bit loose. I took off about 1/2" per sleeve in the underarm seam to make them a little more fitted, and about 1" in each of the side seams.


Sadly, after it was all together and I was hemming, I discovered a hole under one of the woven-in slubs at the back. :/ I'm hoping it doesn't grow - may have to fuse a little interfacing on the back of the fabric to keep it together. The fabric store offered me replacement yardage at the same sale price at least, so I get to go pick out another cardigan!


Sunday, April 27, 2014

Saturday's Sewing


A diaper clutch, custom order by a local friend.

Details
Self-designed
Fabric: Green twill leftover from Abigail's skinnies, striped Quilter's Candy from Connecting Threads, white vinyl
Details: Bi-fold diaper clutch with two pockets, one for diapers & wipes, one for a matching change pad, backed with a flexible vinyl. Button and elastic loop closure.


The change pad has batting sandwiched between the twill and vinyl for substance and softness.  (Side note: I just love that I can get detailed, perfectly lighted photos with my Rebel, with very little work!)


Friday, April 25, 2014

Ten Tips to Terrific Topstitching

Linking up to Crazy Mom Quilts' finish it up Friday - not technically finished the project, just the tutorial! :)


People have remarked before that my topstitching is very accurate so I thought I'd share some of my favourite tricks learned by trial and error.

1. Start with accurate seam and hem allowances. There's only so tidy you can make your topstitching if your seams are uneven.

2. Press! Your iron is your friend. When sewing, anyway. :) (Mine lives in my sewing room and is rarely used for anything besides sewing.)

3. Use a slightly longer stitch length to make your stitches stand out a bit more, but not so long that it's hard to make turns or pivot. My machine's default stitch length is 2.5 and I topstitch at 3.

4. Use the needle-down setting if your machine has one, or be sure whenever you stop to reposition your hands or pivot that you are stopping with the needle down manually. That way there's no chance of the fabric moving or shifting, especially for corners.

5. Take your time. My machine has three speed settings and I generally use the middle one for topstitching, just to be sure I'm in control and I'm not zooming past the end of my stitching line.

6. Follow a guide. I will use the edge of my presser foot or the markings on the machine bed as a guide so that my stitching is parallel to the edge. I also recently discovered that the needle position on my machine is incrementally adjustable, instead of just left needle or centre needle positions! This is huge - I can use the stitch width to control exactly where the needle sits.


7. If you have a built-in walking foot, use it. I don't, so sometimes the top fabric will shift forward under my foot as I stitch. To help it along smoothly, I use a straight pin to hold the top fabric in place as it feeds, repositioning it when it gets close to the needle. Helps to keep from getting bubbles or puckers.


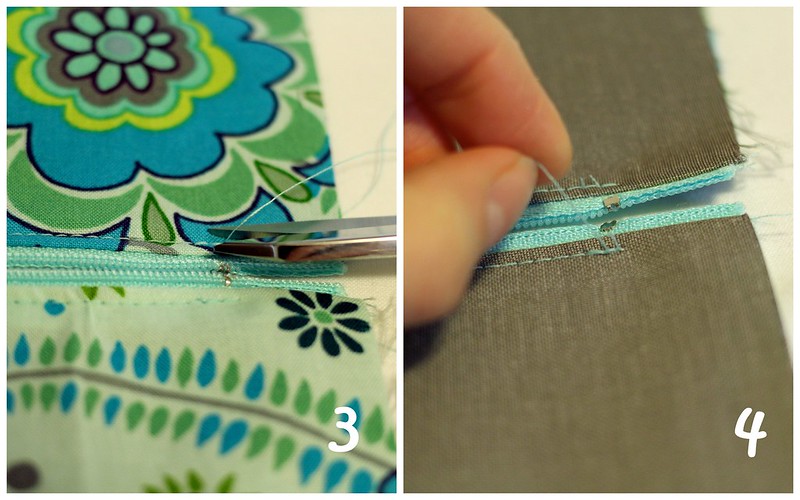
8. Stop with the needle down at the end of your stitching line (unless it's in the seam allowance) and reverse two stitches, then forward two.

9. Clip the thread tail on the right side of your project close to the stitching, then turn it over and gently pull on the thread tail on the underside. The short tail from the front will pop through to the back and then you can trim both.


10. Finished! Admire your terrific topstitching.


Monday, April 21, 2014

Spring Tops for Me!

I've been part of Made By Rae's Spring Top Sewalong before - high time to do it again! Custom made clothing is a good idea for someone with a long back, arms, and legs. It's a drain to go shopping and find pretty things only to have to make do with too-short sleeves and waists and hems that hit in awkward spots. Time to fill my own closet, instead of adding more to my little daughter's!

I tried out Colette's Sorbetto Top, just in some lightweight cotton leftover from my Jenny maxi dress. Based on my measurements I'm supposed to be size 12, so that's what I started from, cutting 2.5" longer for my long torso.

Details
Pattern: Colette Sorbetto Top
Size: 12 (modified)
Mods: I ended up taking up 1/2" in the shoulder seams and 1/2" tapering to 3/4" at the waist on both side seams. I'm not overjoyed with the shape still - might have been better starting with size 10 or even 8. Bias tape is self fabric.


Suzanne went shopping with me last week - I was having heaps of trouble fitting the fabrics I liked with patterns and just couldn't decide. I came home with several fabrics, including these gorgeous prints:


I was thinking of doing Sorbetto again in the left fabric, a white dobby voile, and then the apparel weight cotton in the middle with the tone-on-tone blue beside it for a Patricia Tunic. Not so sure on the Sorbetto now that I've done my muslin. I may try something like a crocheted lace yoked shirt instead...hmmmm....

I also bought this smooth jersey - on sale for $6 a metre! And I only needed a metre - score! (Excuse weird expressions. The man was teasing me while he took my photos.)


Details
Pattern: New Look 6497, View C
Fabric: polyester blend jersey
Mods: Added 2" to the length at the top of the skirt pieces to account for my long back. Shoulder ties are self fabric.
Details: Hemmed at the neck and armholes with twin needle and wooly nylon in the bobbin. The tunic hem is my attempt at a serger lettuce hem.


Fits great and I love it. A very quick sew. My walking foot gets hung up when hemming over seams so there are a few uneven bits in my topstitching. If I did it again I'd probably take in a little bit at the neck edge of each shoulder seam as it tends to slide a bit. It also needs a camisole as it gapes a little at the crossover with movement. I probably would have been better off adding some clear elastic tape the the neck edges to keep snug.


Saturday, April 12, 2014

Blue skies... nothin' but blue skies - KCW Day 6

...I wish. It was ccccold here today again! Next best thing is blue clothes!


Details
Pattern: Self-drafted
Size: 2T
Fabric: Powder blue slub jersey remnant

I took a basic bodice shape and compared it to a thick sweater that fits Abigail for length and width, then drew up a quick pattern with a v-neck front and very simple sleeves. I thought of putting buttons on the front but realized after cutting that I didn't leave room for overlap - duh! So improvised with ties. Ahem! - design feature. Yup.


The fabric was a bit odd to work with - stiff but flimsy, not great recovery. Happy it worked out as well as it did! I took special care understitching and topstitching the facing in, with a double ballpoint needle and woolly nylon in the bobbin again.

She's also wearing her new leggings I made on Day 5 - quite pleased with the fit and glad they look more like proper skinny pants than leggings.

A blustery walk pushing cousin Shawn in the stroller

Friday, April 11, 2014

Kids' Clothes Week Day 5

And leggings to round things out a bit! I'm happy both pairs ended up coordinating with her new top too. No modeling shots - she was done trying things on!


This pair turned out ok, though I'd intended more details so it would have more of a military style. The fabric was pretty substantial but turned out to be tricky to work with. Oh, well, at least she has a sturdier pair of leggings to wear with more dressy things (like her new Ballon Top!).

Details
Pattern: Fancy Little Leggings by Birdiful Stitches
Size: 2T (slim)
Mods: Used the 12mo size with the length of the 2T.
Fabric: Ponte de roma


This floral pair was a total fluke - walked past the remnant bin after getting my ponte de roma and there was this lovely floral french terry remnant. $2! I used about 1/3 of it, so I guess that means this pair cost $0.66...


It's Raining, It's Pouring! KCW Day 4

Well, not really. It sprinkled a bit this morning. My little puddle lover was excited to check out the new puddles - with the "bumbella"!


Details
Pattern: Free Perennial Tunic by SewPony
Size: 92/2y
Fabric: Cotton coordinates. Fell totally in love with the umbrellas and raining hearts last year and bought some even without a project in mind. :)
Mods: Not really any. Didn't have prepared bias tape so I cut a small length of white fabric on the bias and basically wrapped the underarm edge in it, then sewed it down when I topstitched the whole armhole next to the ruffle. Also, the facing didn't quite match up with the neckline so I had to alter it a bit.

Pockets! She does love her pockets.


Back button detail (I topstitched around the back placket for strength.)


Such a big umbrella for such a little girlie!


Thursday, April 10, 2014

Owl Joy - KCW Day 3

Abigail loves her new dress - it's a dress and has a hood, and it has owls! 


Details
Pattern: Peekaboo Pattern Shop Hangout Hoodie
Size: 2T
Mods: Added about 1" to the hem in case it shrinks a bit more. Good thing as it would otherwise have been too short!
Fabric: Joanne Owls interlock and Patty Young's Heaven and Helsinki for Michael Miller pink lattice jersey


Placket detail. Good thing the pink trim has good recovery or the interlock would have been badly stretched out. This part I fiddled on forever! Could not get it square. Finally I basted each corner separately and then was able to serge it in nicely. Topstitched with a double needle and woolly nylon in the bobbin.


"Aren't you done yet, Mom?"


Tuesday, April 8, 2014

Spring! And KCW Day 1&2


Spring!


Today it's 19°C! No Coat Weather. I do believe it's spring here finally! Maybe those dirty piles of snow will take the hint soon.


I had the opportunity to test a pattern for Heidi & Finn, the Ballon Top - just finished today. Abigail fell in love immediately and we had to go for a walk in it right away.


I found this butter soft and drapey jersey and some pretty fairly stretchy dot lace at Fabricland. So thankful for my walking foot for such a thin knit. Most of the construction was done on the serger, just the hemming and gathering on the sewing machine. The patterns has some great tips for rolled hems and finished seams on a sheer fabric. The fit is spot on!


"See me finning, Mama!"  (spinning)


Tuesday, April 1, 2014

Thank you, my moms!

My husband and I enjoyed the first week of March in Mexico -- sans kids, thanks to our moms! I thought this was a good time to make something pretty for each. This is for my mother-in-law, in her favourite colour, purple. It's part of a charm pack of "Lovely" by Debbie Beaves, and I reverse-engineered a photo of the Crossroads Table Runner pattern from here.


I don't usually go for purples at all -- in fact, the only other purple in my stash is what I used for the backing (which was actually given to me by my MIL!) -- but I do love the way it turned out! Especially the stripey binding that Ingrid of QuiltEssentials helped me pick out. The yellow is a semi-solid yardage and the green cornerstone pieces are from the charm pack.


The backing is pieced with the triangles trimmed from the edges of the top, together with some white/cream from stash and the purple bamboo-ish print.


And this is the one for my mom:


It started as a scrap pack from QuiltEssentials, intended to start off my scrap bin for quilting (yes, it's weird that I've sewn for years and really don't have a scrap bin...). The pattern Just the Right Angle was perfect, though mine turned out quite a bit scrappier! I had to piece every bit together instead of doing their method of strip-piecing, as my fabrics were all random squares and strips. I quilted it with my walking foot, similar to the way the original had, echoing the squares and rectangles.


And the backing is more of the scraps, pieced together with some pieces of a retired seafoam sheet. The binding is Quilter's Candy Basics from Connecting Threads. Quite pleased with the quality!


linking up to Kim's Sew-Jo Saturday!