Showing posts with label Farbenmix. Show all posts

Tuesday, August 6, 2013

Happy 2nd birthday, Abigail!

Can't believe it's two years already, baby girl!

Outfits with little books from her brothers for Bitty Baby

Birthday girl - waiting for the guests made her cranky. "Tuptake NOW, pease!"
Skirt details
Pattern: Insa skirt from Sewing Clothes Kids Love
Size: 86 (18m-2T)
Fabric: Andalusia by Patty Young, black tweed-look cotton, solid red cotton.
Notions: grosgrain ribbons, red rickrack, black baby rickrack

I went with a Very Hungry Caterpillar theme for her party. There is certainly lots of ideas linked through Pinterest on this theme! The cake/cupcakes was something I saw in many parties. I found free printables for the foods, shrank them and used them for cupcake toppers.


Cupcake!
Tiny purse made by Suzanne!

Friday, April 26, 2013

KCW Day 4 & 5

Insa again! I seriously love this skirt, from the book Sewing Clothes Kids Love. Lots of ways to customize it so they never look the same.


I was inspired by some of the details on the beautiful Insa Choochmagooz did during KCWC Fall 2010.

Insa by Choochmagooz


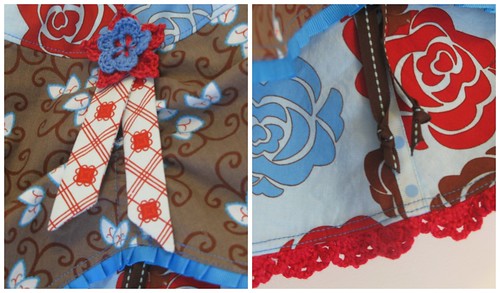
 More of that "Genevieve" by Amy Hamberlin for Henry Glass Fabrics (the fabric that never ends! But I still love it.)

 
Details
Pattern: Insa skirt from Sewing Clothes Kids Love
Size: 18mo/2T (86, I think?)
Fabric: "Genevieve" by Amy Hamberlin
Trims: grosgrain ribbons, hand-crocheted cotton lace and flower
Mods: Sewed casings under each of the overskirt seams, using strips of the same fabric, for the cinching ribbons.
  
And just because she's funny and cute: "Squishy Face!"


Monday, March 18, 2013

Woodland Insa skirt

I have been hanging on to this set of fat quarters for a very long time! I bought them with Abigail in mind, but could not decide on a pattern - I wanted to use all five fabrics, and I wanted the patterns to show well.  Finally figured out I could just squeeze an overskirt and underskirt of the Insa skirt out of each of four prints, and then the yoke and ruffle out of the fifth!


Details:
Fabric: Fabric Palette (Walmart)
Pattern: Insa Skirt from the book Sewing Clothes Kids Love
Size: 18mo-2T (smallest size)
Trims: grosgrain ribbon
 
It can be worn any direction, but the brown panel to front is my fave!   Back view:


Detail:

Friday, October 26, 2012

Feliz Sew-along - Assembling! (part 3)

Feliz Party Dress sew along part 3!
Part 2 - Underdress

Now we have an overdress and an underdress and two straps. Here's how to put it all together:

Assembling the dress

  • Step 1 Pin the straps in place with raw edges aligned (baste, if preferred). Then turn the underdress inside out and place the overdress around the underdress, right side of overdress facing wrong side of underdress. Match the back corners of the overdress side piece with the back corner of the underdress that we left extended. Sew.

  • Step 2 Trim the back corner and clip the curves, then turn.


Press and topstitch all around the top of the dress, being sure seam allowances are tucked in at the back corners.


Sash Casing

  • Step 1 Pin the sash casing with the sash sandwiched between the overdress and the underdress. It just turned out that the back elastic casing exactly matched up with the stitching lines for the casing (no, actually I planned that... lol)

  • Step 2 Sew the sash casing, making sure not to sew through the sash.


Your Feliz Party Dress is finished!!


It's quite long on her still, but I just had to try it on her! She's wearing 12-18 months clothes now, so hopefully this will fit in summer.

Thursday, October 25, 2012

Feliz Sew-along - Underdress (Part 2)

Feliz Party Dress sew along Part 2!
Part 3: Assembling

OK! Now for the underdress. LOTS of photos ahead. :)

1. Straps (I combined the front and back strap pattern pieces and cut them as one. If you are doing both pieces, the first step is to sew that shoulder seam on each strap.)

  • Step 1 Fuse interfacing to two of the shoulder straps

  • Step 2 Sew the straps and clip the inner curves

  • STep 3 Turn, press and topstitch straps.


2. Back panel and elastic casings

  • Step 1 Finish the bottom edge of the back facing and attach any size tags.

  • Step 2 Sew back facing to back underdress, right sides together, along top only.

  • Step 3 Turn, press and topstitch top seam. Mark and sew elastic casings along back. (I marked mine 3/4" wide)

  • Step 4 Insert elastic and securely sew on one end (I used 1/2" wide elastic).

  • Step 5 Cinch elastic to about 2/3 width, then sew ends securely and trim.


3. Back ruffles

  • Step 1 Hem the back ruffles. I did a rolled hem with my serger.

  • (Step 1b - if you are not using ribbon, fold over the top edge of the ruffle to finish, or make sure to sew it on upside down and flip & topstitch)

  • Step 2 Sew seams in bottom ruffle and hem.

  • Step 3 Measure and pin ruffles on back. I sewed the bottom ruffle first, so the hem of the bottom ruffle was at 1/4", the seam allowance for the long ruffle all the way around the bottom edge. Then I placed the other two ruffles from that first one.

  • Step 4 Baste the ruffle edges in the seam allowance.

  • Step 5 Sew ribbon over top edges of all ruffles.


4. Underdress assembly

  • Step 1 Sew front underdress to sides, finish seams, press toward front, and topstitch.

  • Step 2 Sew back underdress to sides, making sure that the side pieces extend above the edge of the underdress back by the width of the seam allowance.

  • Step 3 Finish the seams, press toward the sides and topstitch.


5. Bottom ruffle

  • Step 1 Serge bottom edge of underdress all the way around, then gather and pin the hem ruffle in place evenly. I sewed mine on just overlapping the 1/4 seam allowances, not right sides together, so that there'd be less bulk. (If not using ribbon, sew right sides together, flip down and topstitch.)

  • Step 2 Apply ribbon to top of hem ruffle.


Your underdress is done! Whew. Tomorrow I'll post the last part, assembling all the dress parts!

Part 3: Assembling

Sunday, October 21, 2012

Feliz Sew-along - Overdress (Part 1)

I'm doing a sew-along for the Feliz Party Dress from the book Sewing Clothes Kids Love with a group of friends from a forum I'm on. I figured while I was at it, I'd document it in photos. The instructions in the book leave a bit to be desired details-wise. For my first Feliz, I found the Trillium photo sew-along helpful, but there were a few points that were hazy even there that I'm hoping I can make clearer.  SO here goes!

Part 1: Overdress (this post)

Part 2: Underdress

Part 3: Assembling


Yesterday I tackled the overdress. The book starts with the sash and button loops, then moves on to the overdress, so I will too. (I'm making the smallest size, 86/92 (18mo-2T))


Cutting.  Here are all the pieces cut out. Notes:

  • Pattern does NOT include seam allowances! (not used to that...)  I cut mine at 1/4" because I can do a pretty precise 1/4" seam allowance, and then I serge to finish.

  • For the ruffles on the back of the dress (never mentioned in the book, but everywhere online!), I decided to do three tiers, and then the bottom ruffle around the whole underdress hem. I cut my ruffles at 2.5" width. The length of each I determined by measuring across the overdress back piece at the levels I will sew the ruffles. I did not include hem allowances for ruffles because I will be doing a serged finish on the bottoms of each, and covering the top of each ruffle with ribbon.

  • The first Feliz I made, the back panel of the underdress was pretty heavy, so it hung lower than the front. This one, I shortened the back panel about 1" at the centre, tapering to the edges, so it hangs more evenly with the weight at the back.

  • I cut the front and back shoulder strap pieces together, so there's no seam at the top of the shoulder strap.

  • As per note in book about dressing ease, you can cut the sash pieces 3-4" shorter, then insert elastic in the ends.


1. Piping (optional). I chose to add piping to the front seams of the overdress. I'm using vintage piping that's a really odd size, so I basted it on before sewing those seams.


2. Sash (repeat for second sash piece)

  • Step 1. Fold the sash lengthwise, right sides together, and sew down the long side and one short end. You can either sew the angle as marked on the pattern piece, or just sew it straight (as I did)

  • Step 2. Clip the corners.

  • Step 3. Turn the sash right side out and tuck in the point if you sewed it straight across. Press.

  • Step 4. Turn in raw edges of sash, insert 2-3" of 1" wide elastic into the opening and secure. Topstitch sash.

  • Step 5. Sew the ends of the sash elastic in the seam allowance of the overdress, wrong side. The sashes should be stitched into the seam facing toward the centre of the overdress. (see right)

  • Step 6. Topstitch dress on outside, catching the elastic back on itself in the seam allowance.


3. Ok - I got ahead of myself there. Sew the overdress.

  • Sew overdress side pieces to overdress front piece, right sides together. (I found with getting the piping in straight it was easier to sew these seams, then put the sashes in.)

  • Finish seams.

  • Press seams away from the overdress front toward the sides, then topstitch on the outside.


4. Interfacing for sash casing.

  • I don't have very good photos of this - the interfacing for the casing should actually be applied before sewing the overdress seams. (oops!)

  • Step 1. Cut fusible interfacing using markings on pattern. I cut with 1/4" extra on each edge.

  • Step 2. Apply fusible interfacing to the wrong side of each overdress side piece, where marked on pattern. (Continue to assembling overdress.)


5. Hem and Back Edges

  • Step 1. I'm not using the back facings for this one, but if you are, apply them now. I just serged the edge, pressed it over, and topstitched it down.

  • Step 2. Serge hem of overdress. I used a needle to draw the serger tails back under the stitching.

  • Step 3. Apply hem binding or rickrack (optional). I used a large rickrack. Fold the end under and sew the rickrack onto the right side of the hem so that the serging is just not visible above the dips in the rickrack. I sewed a straight line from one dip to the next, curving the rickrack to follow the hem. At the end of the hem, trim and tuck the end under.

  • Step 4. Finish hem. For rickrack, fold the rickrack to the back of the dress, pressing so the points of the rickrack show evenly. Topstitch.


8. Finished Overdress!


Next: Part 2: Underdress

Monday, September 17, 2012

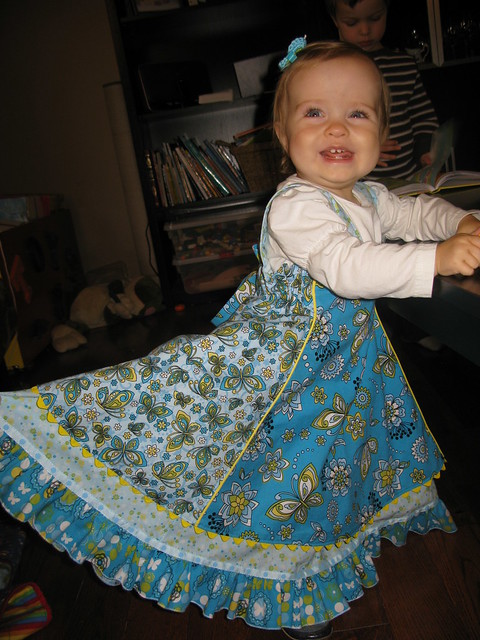
Feliz Finished!

This morning I finished the Feliz Party Dress!!  I love the finished item, but I'm really glad others sewed it before me and made detailed photos/comments on construction, because boy, is the book sparse on directions!

Details:
  • Fabric - "Genevieve" by Amy Hamberlin for Henry Glass Fabrics
  • Trim - grosgrain ribbons
  • Size - 98/104 (3T-4T) size, without seam allowances
  • Modifications/more info - No seam allowances (by mistake, as the patterns aren't marked as needing them - you have to find that detail in the introduction); added 3" of elastic to the inside ends of the sashes, as per the tip in the book; cinched in the back elastic quite a lot; added faux piping (3/4" strip of fabric, pressed in half and inserted in seam) along front panel edges; finished back ends of shoulder straps and topstitched them inside the back of the dress, instead of sewing them into the seam, for adjustability; bias tape trim for overdress.

FRONT VIEW


BACK VIEW


I will try add modeling photos later, if I can find this size model! :)

Saturday, September 15, 2012

Feliz Party Dress

I finally got up the nerve to start the Feliz Party Dress that I've wanted to make since wondering whether our second was a girl or not.   It's from the book Sewing Clothes Kids Love from the Farbenmix/Studio Tantrum folks. The instructions in the book are sparse at best, so I'm using the Trillium photo sew-along for some more tips. My progress so far:

Wednesday was deciding what fabric where:


And then Thursday I finally cut it out:


I sewed the overdress seams, sashes, back facings, piping in the seams, and made a large amount of the brown into bias tape for the hem and applied some.


Friday morning during baby's naptime (2.5hrs!!) I planned and cut the ruffle strips, figured out both a rolled hem and gathering on my serger, sewed on the ruffles and last night I did the ribbon and the side seams on the underdress and the shoulder straps. Getting there!!