Monday, December 31, 2012

2012 in Review


Some (probably most) of 2012's craftiness.  Happy New Year!


Wednesday, December 26, 2012

"Read" Book Bag

Merry Christmas!!  I sure had fun with gifts this Christmas.  Not all handmade, but there were a few - the doll quilt for Abigail, and this:

For my in-laws' gift exchange, I pulled my SILs name. She is working her first year as a teacher. I found this pattern and thought it was perfect!


This was so much fun! I added selvedges to the book spines as titles. Some of them are the fabrics they were cut from, even (I'm such a nerd!).  Suzanne had the idea for the selvedges - most of them are from her stash!


The other side of the bag, and my first time trying English paper piecing:


Inside pocket: apples for a teacher!

Wednesday, December 19, 2012

Teacher Zip Pouch

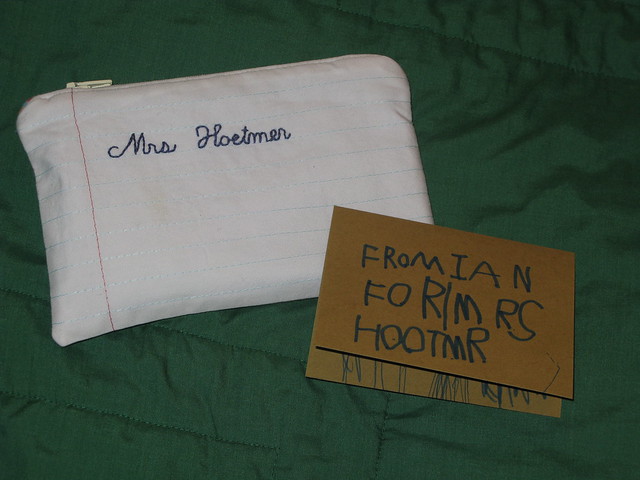
Ian wanted to give his teacher something for Christmas, so i made a little "ruled paper" pouch. (idea for the "paper" from here)  I interfaced a piece of white fabric and then sewed lines at 1/2" intervals in light blue thread across, and another line in pink at 1 1/4" from the side. Then I used a washable marker to write the teacher's name and then embroidered in a backstitch.    (Ian made the card - it's his own spelling! lol)


The back is apples - for a teacher! :D   It makes me happy. I used FlossieTeaCakes tutorial for a zipper pouch - good tutorial. The one thing I'd change if I did it again would be the zipper end covers. They turned out a touch bulky.  Ian bought a little notebook and pen to go with the pouch and is very excited to give it to her tomorrow.

Friday, December 7, 2012

Doll Whirlygig

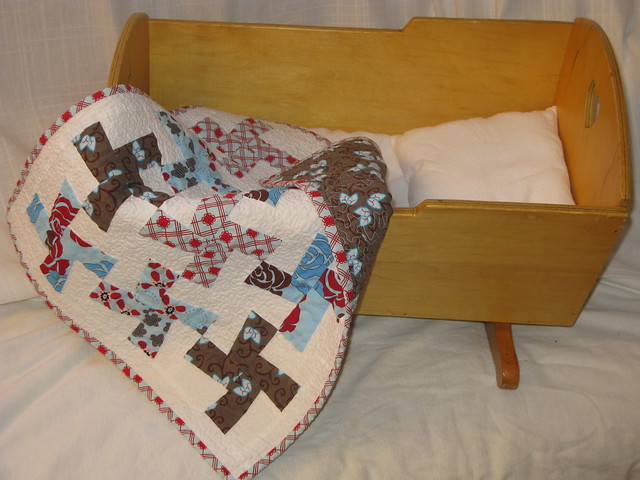
First finished quilt!! Ok, so it's a doll quilt. But still, I sure learned a lot doing this. Such as to count. I made twice as many whirlygig blocks as I needed, somehow...


I used more of the (never-ending) Genenvieve line by Amy Hamberlin. It's for Abigail for Christmas! I am so excited to give her the beautiful doll cradle my dad made for me when I was 3. I also made a little mattress, pillow and sheet for it.


The whirlygig block is from the tutorial here, which was great - no template and no trimming! I also tried out my first free-motion quilting. My machine wasn't too happy about that - it kept having tension difficulties and nesting on the back.


I tried something I've seen my friend Suzanne do and made the back interesting:


Tuesday, November 13, 2012

Ducky Hoodie


Abigail is BIG into ducks lately!! (Mainly because it's a new word for her, I think.) So of course, I had to embellish this hoodie with a baby ducky.


Details

Pattern: Heidi & Finn Urban Unisex Hoodie
Fabric: 3 Superstore teeshirts, polyresin snaps
Size: 18 months
Mods: I skipped the cuffs, hood and sleeve linings, and bottom band. I cut the bodice pieces on the existing teeshirt hems, with a couple inches extra length. Didn't have any large enough pieces for two whole sleeves, so I cut the short sleeve from the sleeves of the yellow teeshirt, and the cut the undersleeve from the orange teeshirt for a faux-layered look (also existing hems!). For the hood, I covered the centre seam with a strip from the yellow teeshirt, and used the neck ribbing from that one for the front edge of the hood. I rolled the yellow lining out a bit to the front when I topstitched the edges. The applique is an image I found online. I used some Heat-n-Bond to apply it, then used a reinforced stitch to outline. 
 
Thrifty Moments: All three teeshirts were on sale for $2 each at Superstore this summer. Also, when I reused the neck binding of the yellow tee, I was able to get the serging out easily, and I reused the yellow thread! (didn't have the right shade yellow in my thread drawer)


And look who's walking! With the help of an old cardboard box. She has been trying out the little walker toy we have too, and even letting go occasionally.


Thursday, November 1, 2012

Sophia Holiday Party Dress

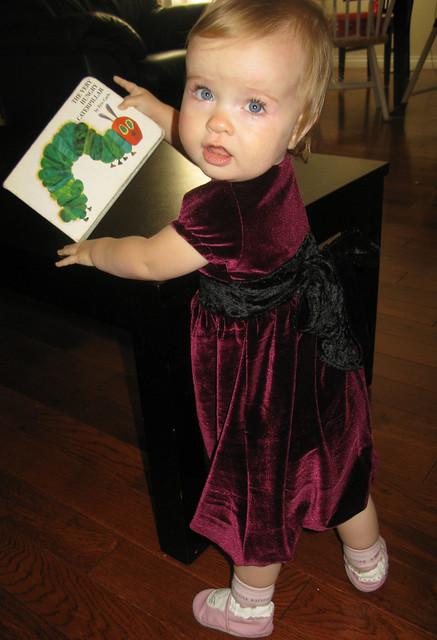
I made the Sophia Holiday Party Dress for Abigail for Christmas/winter. It went together very quickly again (made it last year for Christmas too!).

Pattern: Sophia Holiday Party Dress
Size: 12 months
Fabric: remnants of burgundy velvet, black crushed velour, and thin pink jersey
Mods: Added 2" wide sash.

I love that this cost probably all of $4 to make - gives my thrifty heart thrills. Here's my ticked off little girlie modeling:


I understitched the neckline, instead of pressing or topstitching. Still hoping I can get the creases out of the velvet by steaming.


How I did the sash: I cut two rectangles, 2.5" by the width of each bodice piece. I cut the lining pieces each 2 1/4" longer (ended up trimming 1/4" off later). The sash pieces I cut 4 1/2" wide by about 20" long each. I sewed the sashes lengthwise, right sides facing, tapering to a curve at the ends. I sewed the other two sash pieces to each bodice (used 1/4" s.a. for all) and then when I did the side seams, I inserted each long sash in the side seams, putting a small pleat in the centre of each to fit. Then I assembled the rest of the dress as per the pattern.

Sash detail:


Great pattern, fabulous outcome!  Berritt is great with pattern support and her patterns have lots of photos and detailed instructions. I love how fancy the bubble skirt makes it. The only thing I might change next time would be the neckline. Tends to gape a touch. Either make it less scooped (but then it might not slip over her head?), or maybe just a little lastin in the s.a. would help stabilize/pull in the neckline.

Oh, and one thing I totally didn't think of with adding the sash - I should have just cut the back bodice longer in the burgundy, instead of doing a separate black sash piece at the back. I realized when it was all together that the ends of the sashes are supposed to just extend from the front... Oh well, live 'n learn.

Saturday, October 27, 2012

Star Wars Costumes

On Monday we are going to Star Wars Identities at Telus World of Science! It's been booked for like a year.     Figure we'll use the costumes for Halloween too.  We had this plan we could all go in epic costumes... Well, epic turned into scurry -  here's the handmade/upcycled part.

Abigail as Princess Leia:


Dress
Pattern: L&B's Sweet Little Dress pattern. I just extended the sleeves straight down, then when the dress was assembled I cut the sleeves on an angle down.
Size: 12 months
Fabric: Cotton velour

Belt
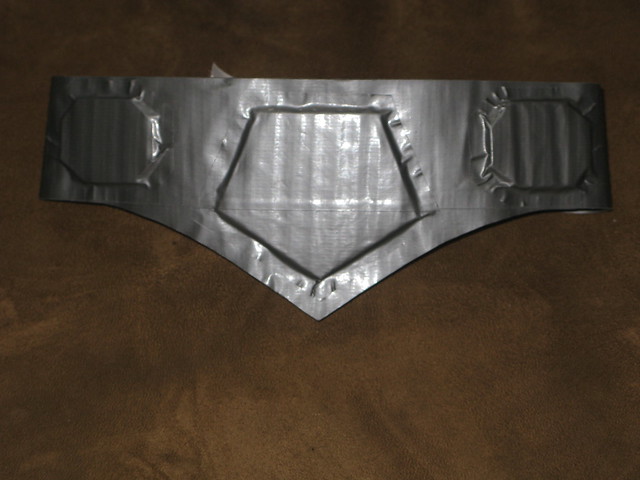
I just used two rows of duct tape backed with another two rows, cut the shape out, and added cardboard cutouts with more duct tape. Then I took a piece of 1/2" elastic and "cased" it on each end inside two more layers of duct tape, and attached velcro. Should fit a nice long time (if it lasts!).


"Wig"

Made a headband out of brown FOE. Braided some dark brown yarn and coiled and sewed it onto felt circles, then attached to either side of the headband.


Benjamin is going as Yoda. He was set on this ever since we watched Star Wars.
Crappy photo (before I adjusted the clothes)

[photo not avail]


Costume
A friend lent us a Judo robe and an old women's robe, which she dyed brown. They were huge on Benny, so I hemmed the sleeves and length of the brown robe, and brought the shoulders up a bit (makes a pleat from the top) and hemmed the sleeves of the white robe.

Yoda Hat
I knitted this hat a week or so ago, and have since then been working on felting it to the right size. It was too huge to start, I think... I ended up sewing some FOE inside the brim to pull it in. I also handstitched wire around the ears and through the top of the hat - it looked more puppy than Yoda. The handstitching took forever!! I should really own a thimble.


The rest of us have store bought costumes. Crappy quality, I might add. And $$$    Oh well - I'll post a photo of all of us together on Monday!