UPDATE: or jump to the tutorial hosted right here!

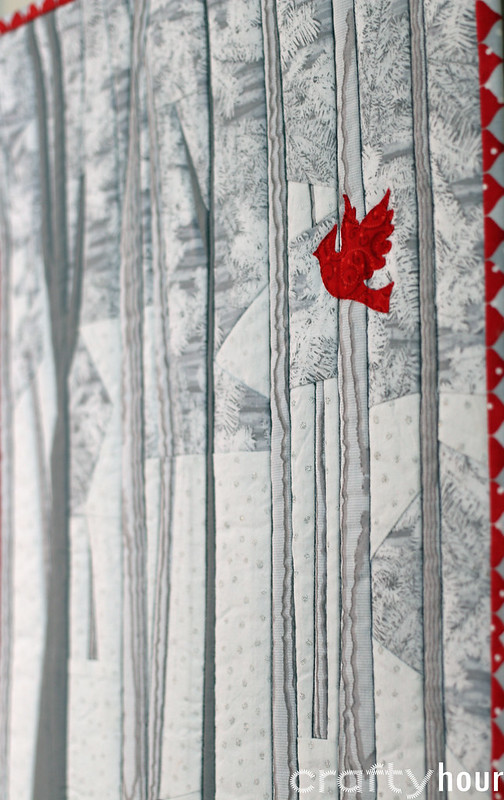
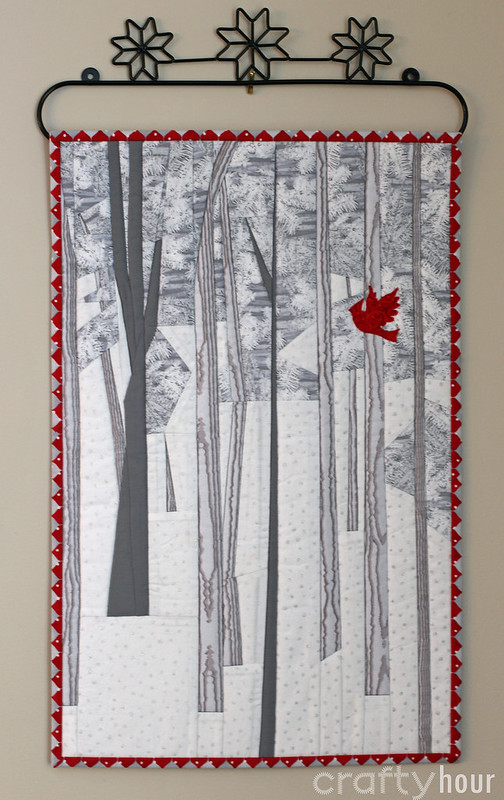
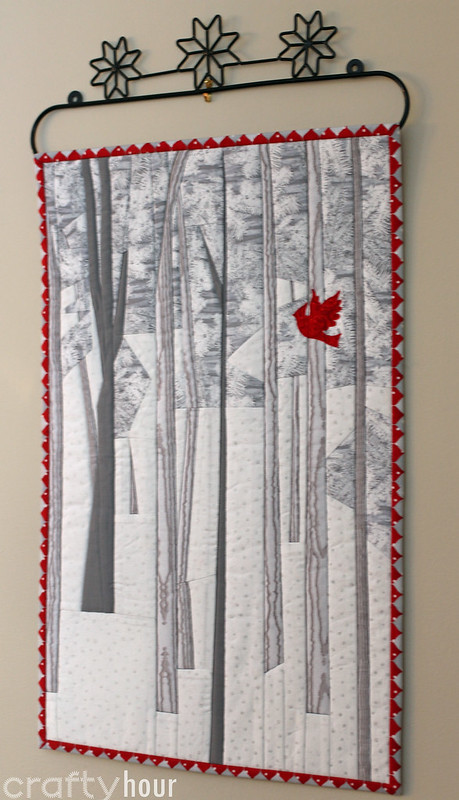
Years ago I pinned this gorgeous paper-pieced block by Trillium Designs, thinking it would make a beautiful full-sized quilt, if only I could find the right scale of prints. I printed the pattern for the block, enlarged to 175%, redrew all the seam allowances back to 1/4", and then just started piecing. I mixed and matched strips to get a long, narrow forest of birch trees.

Obviously this one is a Christmas-themed one, but you could use another colour palette for another occasion. The Wonky Star block was the first quilt block I was really interested in two years ago – I made a quilt with 6″ and 12″ wonky stars as one of my first quilted projects.


Lay out 8 of the white or background squares, and lay 4 triangles of each colour over them, right sides together. You will be sewing the long edge of the triangle to the white square to make one point of the star. Be sure before you sew that the triangle will cover the square below once you flip it open. To get the wonky effect, try to make sure the angles are different for each.

Now trim the white square below and press the triangle open.

Now for the second star points. Place the remaining triangles on each unit in the same way, stitch, trim, and press open.


Arrange the star point blocks around the centre square likes this:

Then sew each row of squares together. Press the two outside rows with the seams toward the outer edge, and the centre row with the seams toward the middle block. This way the seams will nest when you sew the rows together.

Now sew the three rows together, and press the seams. Your wonky star block is complete! Repeat steps for the second block. Each block should measure 3.5″ x 3.5″.

Now to complete your mug rug top, cut two 1.5″ x 3.5″ strips of white and lay the blocks out like this:

Sew one star block to one strip and press the seam toward the strip. Repeat for the second block and strip.


Layer the mug rug top with the batting and backing and pin or baste the three layers together. Now you're ready to quilt!

I chose to do a simple running stitch around my stars with embroidery floss. You could also machine quilt this. Once you're finished, remove any basting stitches and trim the batting and backing.

To bind the mug rug, cut a strip 2″ wide by about 24″. Fold the strip in half, wrong sides together and press. Fold one end of the binding strip 1/4″ under and press. Begin stitching the binding strip, raw edges matching the mug rug, leaving the folded end free, with 1/4″ seam allowance.

When you get to the first corner, stop stitching at the 1/4″ mark, pivot, and sew down to the corner.

Cut your thread and flip the binding up at right angles away from the mug rug, like this:

Then fold it back down with the raw edges matching again. You'll have a nice square corner.

Start stitching 1/4″ in from the end, so you don't catch the fold in your stitching. Repeat for all the corners.

When you get the end, trim the binding strip and slip it inside the beginning of the binding. Finish sewing the binding down.

Now fold the binding to the back and slipstitch it down. Fold the corners to mitre at the back the same way as they are on front.


I've been working on a bit of abstract "art" the last couple of weeks, using the rest of the fabrics from that mug rug!
Years ago I pinned this gorgeous paper-pieced block by Trillium Designs, thinking it would make a beautiful full-sized quilt, if only I could find the right scale of prints. I printed the pattern for the block, enlarged to 175%, redrew all the seam allowances back to 1/4", and then just started piecing. I mixed and matched strips to get a long, narrow forest of birch trees.
The gray/white branch fabric and the binding are from the Holiday Cheer line by Jan Shade Beach, as is the pretty red print for the raw-edge appliquéd cardinal. The wood grain and "snow" (glitter polkadot) fabrics are just from Fabricland.

I found the cutest wall quilt hanger at a local quilt shop and made a simple sleeve for it, just a 2.5" strip with both raw edges sewn into the binding and then handstitched onto the backing.
I found the cutest wall quilt hanger at a local quilt shop and made a simple sleeve for it, just a 2.5" strip with both raw edges sewn into the binding and then handstitched onto the backing.
Now for the Wonky Stars mug rug - wouldn't it make a perfect gift tucked into a stocking, or mailed in place of a Christmas card??

Obviously this one is a Christmas-themed one, but you could use another colour palette for another occasion. The Wonky Star block was the first quilt block I was really interested in two years ago – I made a quilt with 6″ and 12″ wonky stars as one of my first quilted projects.
Materials:
- Scraps of coordinating fabrics – I used a few prints from the Holiday Cheer line by Jan Shade Beach
- Coordinating fabric strip for binding
- White or other solid background
- Small scrap of batting
- Backing fabric
- Embroidery floss in coordinating colours
- Coordinating fabric strip for binding
- White or other solid background
- Small scrap of batting
- Backing fabric
- Embroidery floss in coordinating colours
The finished dimensions of this little mug rug are 4.5″ x 6.5″. It's based on a 1″x1″ grid (finished squares), so if you want to scale up you can figure out the math. For instance, you could add 1/4″ to each piece and end up with a mug rug that was 5.5″ x 8″. So first, we're going to cut out 16 white squares at 1.5″ x 1.5″. Then cut 5 squares, one for the centre and four for the star points, at 1.5″ x 1.5″ of both feature fabrics (the red and gray). (If you want a little more room to play with the wonkiness of each star, cut 4 of the squares at 2″ x 2″)

Now cut all but one of each set of coloured squares in half, from corner to corner, to make triangles. The remaining two full squares will be the centre of each star.


Now trim the white square below and press the triangle open.

Now for the second star points. Place the remaining triangles on each unit in the same way, stitch, trim, and press open.

Use your quilting ruler to square up each set of star points. They should measure 1.5″ x 1.5″ inches. Ideally, there should be 1/4″ seam allowance at the base of each unit where the star points join, so when you stitch them to the centre square you don't have a gap between the points. So you can actually trim a little more off the white edge than the star edge to help achieve this.

Arrange the star point blocks around the centre square likes this:

Then sew each row of squares together. Press the two outside rows with the seams toward the outer edge, and the centre row with the seams toward the middle block. This way the seams will nest when you sew the rows together.


Now to complete your mug rug top, cut two 1.5″ x 3.5″ strips of white and lay the blocks out like this:

Sew one star block to one strip and press the seam toward the strip. Repeat for the second block and strip.

Sew the two halves of the mug rug together and press the seam. Your mug rug top is complete. It should measure 4.5″ x 6.5″.

Layer the mug rug top with the batting and backing and pin or baste the three layers together. Now you're ready to quilt!

I chose to do a simple running stitch around my stars with embroidery floss. You could also machine quilt this. Once you're finished, remove any basting stitches and trim the batting and backing.

To bind the mug rug, cut a strip 2″ wide by about 24″. Fold the strip in half, wrong sides together and press. Fold one end of the binding strip 1/4″ under and press. Begin stitching the binding strip, raw edges matching the mug rug, leaving the folded end free, with 1/4″ seam allowance.

When you get to the first corner, stop stitching at the 1/4″ mark, pivot, and sew down to the corner.

Cut your thread and flip the binding up at right angles away from the mug rug, like this:

Then fold it back down with the raw edges matching again. You'll have a nice square corner.

Start stitching 1/4″ in from the end, so you don't catch the fold in your stitching. Repeat for all the corners.

When you get the end, trim the binding strip and slip it inside the beginning of the binding. Finish sewing the binding down.

Now fold the binding to the back and slipstitch it down. Fold the corners to mitre at the back the same way as they are on front.

And you're done!

Brew yourself a cup of tea or coffee and enjoy your pretty Christmas mug rug – or send it to a friend in the mail instead of a Christmas card!